
Guitar action is crucial to understand and know to adjust your instrument. Therefore it is essential to learn what guitar action is, how to measure it, why guitar action is critical, and how to adjust the action on an acoustic guitar. Let’s find out some effective techniques to adjust the action on your acoustic guitar.
What is Guitar Action?
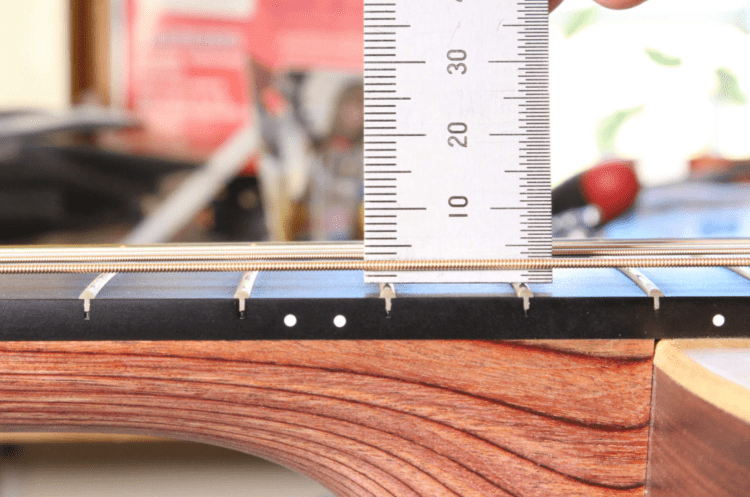
Just imagine, you fall into the zone where you play guitar without any effort. The feeling between the fretboard and the strings is essential to achieve such an experience. The string’s height over the frets dictates how convenient it is to fret and how hard the player can strum with no buzz. This is known as the action, and it goes a low way to determine how an acoustic guitar feels and plays.
Bonding with the element is vital to find that special place. There are some aspects that affect the feeling like scale length, neck profile, width, number of frets, etc. Here in this article, we have mentioned five practical ways for adjusting action on an acoustic guitar.
Action Is Your Personal Preference
The preference of each player is different from another. A luthier may manufacture an instrument to have the lowest action without any buzzing on the frets. This is one way the manufacturer sets up his guitars. Players with different styles prefer different actions too. For instance, a player with a hard-playing style requires high actions to avoid string buzzing, whereas a player with a delicate style loves to go with lower action for effortless fretting.
There are three prime places where you need to take care of action that is 1st, 5th, and 12th frets. For different reasons, you may want to lower or raise the action in one of the places mentioned above. The parts that help to control action are the nut, truss rod, and bridge saddle.
Where and How to Adjust the Action on an Acoustic Guitar
There are five ways where you can change the action. Three of them don’t have or any drawbacks, whereas the other two are more challenging to handle. For adjusting your action on acoustic guitar, there are five effective techniques.
1. Raise or Lower Action by Adjusting the Truss Rod
This metal bar is located inside the neck of the guitar that runs the length of the fretboard. The truss rod is fixed at two endpoints under the fretboard: one is located around the 14th fret, whereas another one is at the starting of the nut.
You can access the truss rod from either top of the neck where the fretboard and headstock meet or inside the hole. It needs an Allen wrench and turning the rod clockwise or counter-clockwise to create a forward-bow or back-bow in the fretboard in the middle of the neck around the 5th fret.
If you need high action in the middle, turn the wrench counter-clockwise. For low action, turn the wrench clockwise. It will only change the frets around the fifth fret more than a first and twelfth. If you turn the truss rod too much, it may introduce fretboard buzz by creating an unwanted plane for strings to sit over.
An essential thing about fret buzz is that it may not be the fault of your guitar. Fret buzz can be caused by any issue related to your playing style or not fretting hard enough. Also, fretboard buzz may occur when the guitar strings are too low, or the fret’s height is uneven. When you are making adjustments, fretboard buzzing issues are common with guitar. For instance, when you raise the action, it will reduce the buzzing, and when you lower it, it will create buzz at certain frets. The truss rod of an acoustic guitar has a significant effect on both lowering and raising the action.
2. Raising the Action by Shimming the Nut
A nut sits in the channel between the fretboard and the headstock. The strings pass over it, which offers a fixed point for the fretboard and the scale length to start at. Lowering or raising the nut affects the action in the area of the first five frets but has a minor effect on the action further up the neck.
If you want to change the action higher up the fretboard (12th or above frets), you need to adjust the bridge saddle. Insert the piece of play card stock to work as a shim underneath the nut. Another helpful tip is to use the pencil under the guitar strings to hold them out of the way when you are working.
Take a playing card and cut a strip about the size of your nut slot. D-tune your guitar and remove the nut. Now place the card into the channel, replace and re-tune it. Check whether it feels perfect, and then repeat the step using another shim.
If the guitar nut doesn’t come out conveniently or at all, it may be held tightly in place by glue, lacquer, or both. This is common, but you have to put some effort to safely remove the nut. Don’t put extra force on the nut to prevent any damages.
3. Lower the Action by Sanding the Nut
This method is the opposite of the second technique. Instead of raising the nut, you need to lower it. Remember, you have to perform the action carefully as sanding off too much material may create issues.
The procedure is to sand the bottom side of the nut using the piece of sandpaper while lowering its overall height. This is a serious process as you have to remove and reattach the strings several times to check the height of the nut. Remember, sanding out the nut too far can make it too low and lead to fretboard buzz problems.
The amount of sand away depends on your preference, as it depends on how high the action is and how to lower you want the action. If you alter the nut too much, it may be significant to head to a repair shop to buy a new nut. You may need to turn right back around and use the second method to shim it back up.
4. Raise the Action by Shimming the Bridge Saddle
Just like the second technique, we are going to use it to raise the bridge saddle. The saddle is a durable piece of plastic or bone that sits perfectly within the bridge of the guitar, which is mounted to the belly of the instrument and securely holds the endpoint of the strings.
By adjusting the height of the saddle, the action will change more the twelfth fret than the first one. This is an excellent technique to raise the action further up to the fretboard (from the 12th fret and above).

The parts required are a bridge saddle of the guitar and a strip of a playing card. First, you need to cut the piece of the card with approximately the same length and width as the slot bridge saddle fits into. Make sure to make it smaller than the slot so that it can properly lie flat against the bottom of the slot.
Once you got a perfect fit where the play card shim lies flat in the channel, replace the saddle bridge on the top of it and then restring the guitar. Remember; don’t use glue. Never glue the bridge saddle of an acoustic guitar in place.
5. Lowering the Guitar Action by Sanding the Bridge Saddle
Just like the third method, this technique involves sanding the guitar saddle to the required height. It has some benefits and drawbacks to sanding the nut. However, an additional factor is to pay attention to the saddle that it should achieve a certain height to prevent the guitar strings from buzzing.
One of the best things about these techniques is that you can easily use them together. For instance, if you sand away extra of the saddle or nut and make it too low, then you have to add a shim. However, there is a restriction to the number of shims you can use before the guitar saddle starts to rock back and forth. It is recommended not to use more than one or two shims because the saddle or nut becomes less stable and can move around while playing the guitar.
Final Words
These five techniques for adjusting the nut, truss rod, and bright saddle allow changing the action on an acoustic guitar on your own. Remember, a small amount of change in the action results in an apparent difference in how the guitar plays. The best way is to make a change and then use it for few days to get used to it. Sanding the saddle and nut can be a tricky process that should be performed with caution. Make sure to go slowly when adjusting them and check the process frequently. Action is the most significant aspect of the guitar’s playability. So it is wise to consider trying one of these procedures if you feel that you need some improvements.