
Just like any other recording, capturing a fabulous acoustic guitar sound depends on what you want o achieve. For instance, are you aiming for mid-range resonance, aggressive picky, or a bright metallic sound? Adding a microphone to acoustic guitar can be tricky and indeed very important as it is the main factor for recording ideal recorded acoustic guitar tracks. Therefore, it is essential to know how to Mic an acoustic guitar properly to achieve desired results? Choosing the right microphone for acoustic guitar is also very important. Here are some effective techniques that will help you to Mic an acoustic guitar easily.
How to Mic an Acoustic Guitar
The first and most important thing before your Mic an acoustic guitar is to understand your instrument. The first place to consider is the soundhole of the guitar. Remember, you should not always place the Mic directly into the soundhole and expect ideal input. By doing so, you will end up with a boring boom sound blasting frequencies across your room. In simple words, it will kill the harmony of the tone you are looking for.
1. Mic Placement for Recording Acoustic Guitar
Here are the two best spots for achieving desired results.
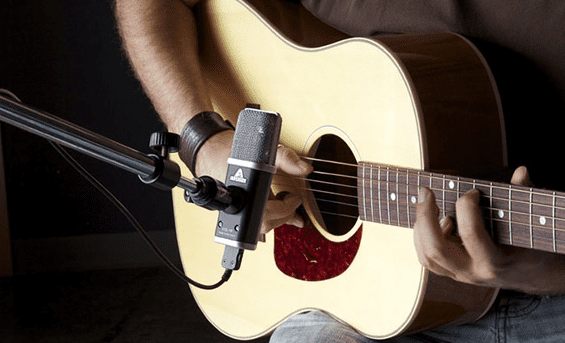
i) Place Your Mic a Little above the Sound Hole
It will allow getting a more balanced tone with a little bass touch as compared to the overwhelming bass room it offers when placed directly by the soundhole.
Make sure to keep the distance around 12-16 inches away from the hole for fuller sound.
ii) Place Your Mic below or Behind the Bridge
Such Mic position offers slightly less bass, and it may not provide much-fretted string details; the midrange is very clear. When the acoustic guitar is strummed, the pick sounds are capture more closely at this position.
Make sure to place the Mic 6-12 inches away from the 12th fret to capture a more balanced, natural, and high-end sound. Such area is towards the neck of the guitar and the sweet spot of the instrument. The best benefit of this position is that you will able to capture the true tone of your acoustic guitar.
2. Microphone Size and Type
There are two types of microphones for acoustic guitars are Condenser microphones and Dynamic microphones.
Condenser mics are used by sound engineers as they are highly sensitive, but on many occasions, dynamic works best. However, it depends on the type of sound you are looking for.
When using condenser mics, remember, large diaphragms offer more expression and boldness to the guitar sound, whereas the small diaphragms keep the natural sound of the guitar.
However, if you are able to try as many microphones as you can, you can find the best microphone for acoustic guitar. You can also try a mix of larger diaphragms which offers body to the sound, and smaller diaphragms for a detailed and bright sound. Such a combination is highly recommended.
3. Always Choose Right Location for Recording
The sound, size, and condition of the recording room have a big influence on your recording. One thing you need is to understand that choosing the right Mic for acoustic guitar can be important, but the location in which you are recording may create some serious issues if not selected wisely.

Unfortunately, most people neglect the importance of location. A room with a hard surface offers more reflections and gives the sound more character. However, controlling the sound direction can be a tough task.
Besides location selection, don’t forget to tune your ears when playing, as it can help to pick up the best-sounding spot to set up Mic. Remember, there is no permanent position for the Mic during recording because different factors may lead to frequent changes of spots.
4. Mix Options
You need to bring an extra Mic into your recording session. You can either use this Mic by lining the Mics together or also putting them apart at various strategic locations. You should properly line the two Mics for the two signals to blend perfectly.
If you don’t do this in the right way, it can result in phasing problems where the sound waves hit a Mic at different times and may end up mudding the sound. The two best positions for Mic testing are to place one at the 12th fret, and another one is to place it at the bridge.
If you are having issues with sound on your guitar check out our article on improving the sound of your guitar here.
Final Words
To get desired results from how to Mic an acoustic guitar, it is important to become creative and experiment at different locations using various acoustic guitar microphones and also sounds spots. It will definitely help you to realize what works best for you. There is no single style that fits all for acoustic guitar but trying different things can be useful to achieve desired results.